Ladder Logic for Arduino.
In this article the way how to run program in ladder logic from LDmicro on Arduino is presented. LDmicro is free SW to write and simulate ladder logic programs. When is ladder logic program is successfully simulated it could be compiled for AVR or PIC processor. However ATmega used in Arduino is not supported. Fortunately LDmicro can “compile” code into ANSI C. So, let’s take a look how we can run this code on Arduino.
Little Background
When we select ANSI C Code as Microcontroler type in Settings menu of LDmicro after compile we will get C file. This file contains all logic but it requires header file ladder.h which is missing. So, we have to implement this file. Let say we have input contact called “button” then we have to implement function:
BOOL Read_U_b_Xbutton(void) {
 return digitalRead(10); // button on digital pin 10
}
And similar to others input and output pins. Actually we have to write the layer between leader logic program and real HW of Arduino. And it could be more than simple call of digitalRead or digitalWrite. For example we could control servos, read data from proximity sensor and so on. Ability to write this layer is very powerful. Ladder logic could be used for core logic of application and C only for HW layer.
For more information read actual generated C file. It contains more information.
Generating ladder.h
If we need just direct control of digital IO pins of Arduino ladder.h could be easily generated for us. I wrote PHP script that can do this job. It requires generated code and mapping between variable name we use in ladder logic and pin numbers of Arduino. It will generate ladder.h with all nessesary functions and setup function (correctly calls pinMode for all used digital pin). Script could be used as console application or it’s also available online.
Step by step
Let’s do it step by step. Complete example is available for download.
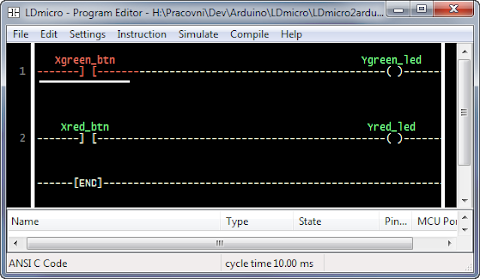
1. Write code in LDmicro.
2. Select as Microcontroller “ANSI C Code”.
3. Compile it as ladder.cpp (save it as *.cpp file not *.c, otherwise Arduino won’t compile it)
4. Prepare mapping for IO pins of Arduino. Its text file called pinmap.ini. See example for details.
5. Generate ladder.h file by ladder-gen.php.
d0” for arduino digital pin 0, “d1” for pin 1 and so on.
6. Create Arduino sketch.
#include "ladder.h"

void setup() {
    PlcSetup();
}

void loop() {
    PlcCycle();
    delay(10);
}
See example for better sketch implementation (this one is for illustration and it's not accurate for timers).
7. Compile it by Arduino editor and upload it.
8. That’s all.
Conclusion
I hope presented method will help you start with ladder logic for Arduino. If you have any suggestion or find a bug in script, let me know.
Acutally I tried but its not happenning
ReplyDeleteIt is showing this error:
ladder.cpp:15:20: error: ladder.h: No such file or directory
ladder.cpp:42: error: 'BOOL' does not name a type
ladder.cpp:45: error: 'BOOL' does not name a type
ladder.cpp:48: error: 'SWORD' does not name a type
ladder.cpp:51: error: 'BOOL' does not name a type
ladder.cpp:52: error: variable or field 'Write_U_b_Y13' declared void
ladder.cpp:52: error: 'BOOL' was not declared in this scope
ladder.cpp: In function 'void PlcCycle()':
ladder.cpp:61: error: 'I_b_mcr' was not declared in this scope
ladder.cpp:64: error: 'I_b_rung_top' was not declared in this scope
ladder.cpp:68: error: 'U_i_Tnew' was not declared in this scope
ladder.cpp:73: error: 'U_i_Tnew' was not declared in this scope
ladder.cpp:76: error: 'Write_U_b_Y13' was not declared in this scope
It looks like you have omitted to generate ladder.h file.
Deleteif u upload the procedural video that may help a lot. thanks!!
ReplyDeleteI am running this on linux.
ReplyDeleteWhere does the pinmap.ini come into play?
This looks real exciting but I just quite don't understand.
Thanks
Dave
pinmap.ini contains mapping between variable names in the LDmicro and actual digital pins of the Arduino (variable name → pin number). Ladder-gen.php use this file to generate ladder.h. If this file is missing default mapping (“d0” → pin 0, “d1” → pin 1 and so on) is used.
DeleteWhy I can't use PWM in LDmicro using this method? Is there any way to use it?
ReplyDeleteUnfortunately LDmicro doesn’t support pwm instruction in C code. However you have access to any variables in LDmicro program from C code.
DeleteSo it’s possible to use variable called e.g. “pwn” in LDmicro program and after every PlcCycle set arduino PWM output according to this variable. Variable name in C will be something like “U_i_xxx”.
Example: http://gist.github.com/2602423#file_pwm.pde (see variable U_i_pwm on line 18)
I tried to upload the example code you provided onto my arduino, and i received numerous errors. Could you give any insight into what is wrong? I am Arduino IDE 1.0
ReplyDeleteThank you for notice. I have made some changes and now I should work fine (tested in 0023 and 1.0 IDE version). Please, download new version and let me know if it works.
Deletecan you show how get the ladder.h file
DeleteThe easiest way:
Delete1) Assume you have your program in LDmicro and you have compiled it into ladder.cpp. Input and output pins in LDmicro program are called “d0” for arduino digital pin 0, “d1” for digital pin 1 and so on.
2) Copy content of ladder.cpp into http://adam.horcica.cz/tools/ladder-gen/ and press generate. The result is content of your ladder.h file.
pinMode of arduino pins are determined automatically (algorithm is simple, every time when you use pin as output, the pin mode is set to output otherwise it's input).
If you want to have different names for input and output pins you have to use ladder-gen.php as described in article. However you need PHP interpreter installed on your computer.
i am a student working on arduino project
Deletei want to use ladder-gen.php (No previous knowledge of php)
can you tell me how to use this tool
php ladder-gen.php [path-to-sketch-folder]
This comment has been removed by the author.
ReplyDeletehi adam
ReplyDeletei have done correctly but i am getting error
sketch_jun04a.cpp.o: In function `loop':
C:\Users\RINKU\AppData\Local\Temp\build8371174935676393128.tmp/sketch_jun04a.cpp:11: undefined reference to `PlcCycle()'
hi,
Deleteprogram is running correctly, initially i was doing some mistake now it working fine.
Hi :
DeleteI also got same error:
ladder.cpp.o: In function `loop':
C:\Users\steve\Documents\arduino-1.0.5/ladder.ino:15: undefined reference to `PlcCycle()'
Will you please tell me how to to fix ?!
THANKS!
Hi,
ReplyDeleteThis error is coming because you didn't include the .cpp file in your program,your program should contain main program, .cpp file and ladder.h file and main program should be like
#include "ladder.h"
void setup() {
PlcSetup();
}
void loop()
{
PlcCycle();
delay(10);
}
only hope your problem will solve ...
i prove it, and it works :D Arduino 1.0.5 with generic Arduino
ReplyDeleteI have error
ReplyDeletesketch_jan23a.cpp.o: In function `loop':
C:\Program Files\Arduino/sketch_jan23a.ino:9: undefined reference to `PlcCycle()'
if I include ladder.cpp, ima got error
sketch_jan23b.ino:2:22: error: ladder.cpp: No such file or directory
Can you help me?
I find these errors with Arduino 1.0.5-r2
DeleteWill you please tell me how to to fix ?!
THANKS!
You are getting this error becoz you miss some file
ReplyDeleteyour arduino program should contain there window..
1. .cpp file
2. ladder.h file
3. main program
.cpp window is code which contain c program of ladder logic
ladder.h window is code after generating form ladder-gen.php
main window simple call the all function
your main program look like this
#include "ladder.h"
void setup() {
PlcSetup();
}
void loop()
{
PlcCycle();
delay(10);
}
now it should work ..!! :)
Can not get it to work on a mega 2560. I was able to get it to work with Uno but not mega. Can anyone help?
ReplyDeleteFigured out that it will not do higher pins. I tried on 44 and it won't work. However, it does work on pin 11 and 12.
DeleteHello Adam,
ReplyDeletecan be used in LDmicro analog inputs?
It makes me a brief example of syntax?
Luigi
Hello Adam,
ReplyDeletecan be used in LDmicro analog inputs of arduino?
It makes me a brief example of syntax?
Luigi
Hello,
ReplyDeleteI have a hard time understanding the code files LDmicro, they are part of what compiler? Would Visual Studio? Which version?
I would be grateful if you would point me a way forward.
Thank you.
i have error when i use ANSI c Code its not support file
ReplyDelete#include
ReplyDelete/* Define EXTERN_EVERYTHING in ladder.h if you want all symbols extern.
This could be useful to implement `magic variables,' so that for
example when you write to the ladder variable duty_cycle, your PLC
runtime can look at the C variable U_duty_cycle and use that to set
the PWM duty cycle on the micro. That way you can add support for
peripherals that LDmicro doesn't know about. */
#ifdef EXTERN_EVERYTHING
#define STATIC
#else
#define STATIC static
#endif
/* Define NO_PROTOTYPES if you don't want LDmicro to provide prototypes for
all the I/O functions (Read_U_xxx, Write_U_xxx) that you must provide.
If you define this then you must provide your own prototypes for these
functions in ladder.h, or provide definitions (e.g. as inlines or macros)
for them in ladder.h. */
#ifdef NO_PROTOTYPES
#define PROTO(x)
#else
#define PROTO(x) x
#endif
/* U_xxx symbols correspond to user-defined names. There is such a symbol
for every internal relay, variable, timer, and so on in the ladder
program. I_xxx symbols are internally generated. */
STATIC BOOL I_b_mcr = 0;
#define Read_I_b_mcr() I_b_mcr
#define Write_I_b_mcr(x) I_b_mcr = x
STATIC BOOL I_b_rung_top = 0;
#define Read_I_b_rung_top() I_b_rung_top
#define Write_I_b_rung_top(x) I_b_rung_top = x
/* You provide this function. */
PROTO(extern BOOL Read_U_b_X1(void);)
/* You provide these functions. */
PROTO(BOOL Read_U_b_Y1(void);)
PROTO(void Write_U_b_Y1(BOOL v);)
/* Call this function once per PLC cycle. You are responsible for calling
it at the interval that you specified in the MCU configuration when you
generated this code. */
void PlcCycle(void)
{
Write_I_b_mcr(1);
/* start rung 1 */
Write_I_b_rung_top(Read_I_b_mcr());
/* start series [ */
if(!Read_U_b_X1()) {
Write_I_b_rung_top(0);
}
Write_U_b_Y1(Read_I_b_rung_top());
/* ] finish series */
this is the error come out, but i am trying to solve i can't
ReplyDeletethanks
Have you tried to save it as *.cpp file (as I write in article)?
DeleteHi, Adam i have save the file in *.cpp file but is unable to success. By the way recently i was purchase ESP8266 and i was tried to do compile the file its same results was i get it the error in below.
Deletecompilation terminated.
exit status 1
ladder.h: No such file or directory
Invalid library found in C:\Program Files (x86)\Arduino\libraries\Arduino-master: no headers files (.h) found in C:\Program Files (x86)\Arduino\libraries\Arduino-master
Invalid library found in C:\Program Files (x86)\Arduino\libraries\Arduino-master: no headers files (.h) found in C:\Program Files (x86)\Arduino\libraries\Arduino-master
This report would have more information with
"Show verbose output during compilation"
option enabled in File -> Preferences.
This comment has been removed by a blog administrator.
ReplyDeleteSir please help me....
ReplyDeleteI have an error like below....
Thanks....
In file included from sketch_may19a.ino:1:
C:\Program Files\Arduino\libraries\ladder/ladder.h: In function 'boolean Read_U_b_Yunroller()':
C:\Program Files\Arduino\libraries\ladder/ladder.h:62: error: 'v' was not declared in this scope
C:\Program Files\Arduino\libraries\ladder/ladder.h:63: warning: no return statement in function returning non-void
C:\Program Files\Arduino\libraries\ladder/ladder.h: In function 'void Write_U_b_Yunroller(boolean)':
C:\Program Files\Arduino\libraries\ladder/ladder.h:67: error: return-statement with a value, in function returning 'void'
C:\Program Files\Arduino\libraries\ladder/ladder.h: In function 'boolean Read_U_b_Yledroller()':
C:\Program Files\Arduino\libraries\ladder/ladder.h:72: error: 'v' was not declared in this scope
C:\Program Files\Arduino\libraries\ladder/ladder.h:73: warning: no return statement in function returning non-void
C:\Program Files\Arduino\libraries\ladder/ladder.h: In function 'void Write_U_b_Yledroller(boolean)':
C:\Program Files\Arduino\libraries\ladder/ladder.h:77: error: return-statement with a value, in function returning 'void'
C:\Program Files\Arduino\libraries\ladder/ladder.h: In function 'boolean Read_U_b_Xlimitswitchunro()':
C:\Program Files\Arduino\libraries\ladder/ladder.h:82: error: 'v' was not declared in this scope
C:\Program Files\Arduino\libraries\ladder/ladder.h:83: warning: no return statement in function returning non-void
Hi all, I have taken on the task of making a video about this method, thanks adam by this method.
ReplyDeletehttps://www.youtube.com/watch?v=W7YL1HNweh8
no disponible su video amigo, vuelvalo a subir porfavor!!
Deletehola quetal compañero queria saber como puedo arreglar un problema que tengo con el archivo ladder.h al compilar en el entorno de arduino me aparece un error que es el siguiente"" PORFAVOR UN AYUDA GRACIAS"":
ReplyDeleteArduino:1.6.6 Hourly Build 2015/07/21 05:42 (Windows 8), Placa:"Arduino Uno"
Utilizando biblioteca ladder en carpeta: E:\Program Files (x86)\Arduino1.6.5\arduino-nightly\libraries\ladder (legacy)
In file included from TEST_PLC.ino:1:0:
E:\Program Files (x86)\Arduino1.6.5\arduino-nightly\libraries\ladder/ladder.h: In function 'boolean Read_U_b_XSFC()':
E:\Program Files (x86)\Arduino1.6.5\arduino-nightly\libraries\ladder/ladder.h:40:1: error: 'retrun' was not declared in this scope
retrun digitalRead(5);
E:\Program Files (x86)\Arduino1.6.5\arduino-nightly\libraries\ladder/ladder.h:40:8: error: expected ';' before 'digitalRead'
retrun digitalRead(5);
E:\Program Files (x86)\Arduino1.6.5\arduino-nightly\libraries\ladder/ladder.h: In function 'boolean Read_U_b_YRFC()':
E:\Program Files (x86)\Arduino1.6.5\arduino-nightly\libraries\ladder/ladder.h:45:1: error: 'retrun' was not declared in this scope
retrun digitalRead(9);
E:\Program Files (x86)\Arduino1.6.5\arduino-nightly\libraries\ladder/ladder.h:45:8: error: expected ';' before 'digitalRead'
retrun digitalRead(9);
E:\Program Files (x86)\Arduino1.6.5\arduino-nightly\libraries\ladder/ladder.h: In function 'boolean Read_U_b_YFFC()':
E:\Program Files (x86)\Arduino1.6.5\arduino-nightly\libraries\ladder/ladder.h:55:1: error: 'retrun' was not declared in this scope
retrun digitalRead(8);
E:\Program Files (x86)\Arduino1.6.5\arduino-nightly\libraries\ladder/ladder.h:55:8: error: expected ';' before 'digitalRead'
retrun digitalRead(8);
E:\Program Files (x86)\Arduino1.6.5\arduino-nightly\libraries\ladder/ladder.h: In function 'boolean Read_U_b_XSPo()':
E:\Program Files (x86)\Arduino1.6.5\arduino-nightly\libraries\ladder/ladder.h:65:1: error: 'retrun' was not declared in this scope
retrun digitalRead(6);
E:\Program Files (x86)\Arduino1.6.5\arduino-nightly\libraries\ladder/ladder.h:65:8: error: expected ';' before 'digitalRead'
retrun digitalRead(6);
E:\Program Files (x86)\Arduino1.6.5\arduino-nightly\libraries\ladder/ladder.h: In function 'boolean Read_U_b_YRSPo()':
E:\Program Files (x86)\Arduino1.6.5\arduino-nightly\libraries\ladder/ladder.h:70:1: error: 'retrun' was not declared in this scope
retrun digitalRead(10);
E:\Program Files (x86)\Arduino1.6.5\arduino-nightly\libraries\ladder/ladder.h:70:8: error: expected ';' before 'digitalRead'
retrun digitalRead(10);
E:\Program Files (x86)\Arduino1.6.5\arduino-nightly\libraries\ladder/ladder.h: In function 'boolean Read_U_b_XPM()':
E:\Program Files (x86)\Arduino1.6.5\arduino-nightly\libraries\ladder/ladder.h:80:1: error: 'retrun' was not declared in this scope
retrun digitalRead(7);
E:\Program Files (x86)\Arduino1.6.5\arduino-nightly\libraries\ladder/ladder.h:80:8: error: expected ';' before 'digitalRead'
retrun digitalRead(7);
E:\Program Files (x86)\Arduino1.6.5\arduino-nightly\libraries\ladder/ladder.h: In function 'boolean Read_U_b_YRPM()':
E:\Program Files (x86)\Arduino1.6.5\arduino-nightly\libraries\ladder/ladder.h:85:1: error: 'retrun' was not declared in this scope
retrun digitalRead(11);
E:\Program Files (x86)\Arduino1.6.5\arduino-nightly\libraries\ladder/ladder.h:85:8: error: expected ';' before 'digitalRead'
retrun digitalRead(11);
Is it possible to generate the .CPP code to .H code offline (without network connection)?
ReplyDeletehi ,all its long time ready i not online in this blog, any how i will try out the error in the program thanks
ReplyDeleteHello,
ReplyDeleteNow with 3.4.0 un-official version you can use the arduino
directly in ldmicro. the software support all atmega.
And i use Xloader to upload the hex file in the arduino
with the arduino boot-lodaer.
Cooolll
Hello sir
DeleteI want to be grateful to accept me said request and this for problem gives me arduino map laying programming with the ladder language with ldmicro software.
My problem is that I upload a hex file from ldmicro the televrison ca happen but the program does not work the pine led 13 it stays on or place dr flashing, and counter the hex file of the arduino software it works And the led flashes.
The one you like I want to see the problem.
I brought to your knowledge that I tried to upgrade the hex file of ldmicro with 3 software Xloader v 1.00 AVRDUDESS 2.4 V 6.1 and SinaProg. And I find same problem, I was watching several videos that pass bin operation are problem but I do not know how.
Thank you in advance, madam, sir (messaoudihicham33@gmail.com)
I add the link :
ReplyDeleteLdmicro 3.4.0
http://cq.cx/ladder-forum.pl?action=viewthread&parent=5105
Xloader:
http://www.hobbytronics.co.uk/arduino-xloader
Gerard.
Hello,
ReplyDeleteSorry for the late reply, but you need to use the cpu port name
ex : led 13 is PB1
see this page on this website
http://christianto.tjahyadi.com/wp-content/uploads/2014/11/nano.jpg
The MCU Crystal Frequency is 16 Mhz for an arduino nano v3
The microcontroler is mega328
And more, if you want, you can test you program before
progam you arduino by simulIDE.
http://simulide.blogspot.be/ it's FREE.
Thanks,
Gerard
Hi Adam!
ReplyDeleteCould you show an example using timers and counters?
Thanks for your attention
This comment has been removed by a blog administrator.
ReplyDeleteIf you're searching for a good projector you may keep around the house for a long time to come, the W1070 might be your best choice. Learn about Electronics Archives - Cart Big on pickup-world.com
ReplyDeleteThis comment has been removed by the author.
ReplyDeleteWired projectors on the opposite hand are a small complex to use. The most suitable projector can give you and your family lots of fun but can be challenging too on sparrowsurf.
ReplyDeleteHi, am a student doing a project, wondering is it possible to do analog input from i.e a sensor?
ReplyDeleteI am a student doing a project, wondering is if you can resolve my problem, I have this error:
ReplyDeleteArduino:1.8.8 (Windows 10), Tarjeta:"Arduino/Genuino Uno"
C:\Program Files (x86)\Arduino\libraries\ladder\ladder.cpp:1:1: error: 'LDmicro0' does not name a type
LDmicro0.1
A very helpful guide to learn to run ladder logic for Arduino. It is to the point and directive in nature.
ReplyDeleteSuch articles need to be published more so that a lot of buyers can be helped
ReplyDeleteHVAC parts are important to keep your HVAC system working properly. These items are needed for certain repairs and maintenance. Click here to get more information about hvac parts store.
ReplyDeleteHello everyone, below is a link to a running tutorial on Youtube with the latest development of LDmicro.
ReplyDeletehttps://youtube.com/playlist?list=PLjkzNLFcHTFCSp6pkySIH4U75Qsopt6Xv
no deposit bonus forex 2021 - takipçi satın al - takipçi satın al - takipçi satın al - takipcialdim.com/tiktok-takipci-satin-al/ - instagram beğeni satın al - instagram beğeni satın al - google haritalara yer ekleme - btcturk - tiktok izlenme satın al - sms onay - youtube izlenme satın al - google haritalara yer ekleme - no deposit bonus forex 2021 - tiktok jeton hilesi - tiktok beğeni satın al - binance - takipçi satın al - uc satın al - finanspedia.com - sms onay - sms onay - tiktok takipçi satın al - tiktok beğeni satın al - twitter takipçi satın al - trend topic satın al - youtube abone satın al - instagram beğeni satın al - tiktok beğeni satın al - twitter takipçi satın al - trend topic satın al - youtube abone satın al - instagram beğeni satın al - tiktok takipçi satın al - tiktok beğeni satın al - twitter takipçi satın al - trend topic satın al - youtube abone satın al - instagram beğeni satın al - perde modelleri - instagram takipçi satın al - instagram takipçi satın al - cami avizesi - marsbahis
ReplyDeleteYour site is really very good. I have seen your post and That is very informative and helpful for me. Is a visa for Turkey from USA necessary or not ? Yes, of course, all the USA citizens need a visa to enter Turkey. It is a necessary Turkish travel document. USA citizens without a visa or evisa can not enter into the border of a Turkey country.
ReplyDeleteThe creation of a ladder is not as simple as it seems. It requires the right tools and knowledge. I can suggest the best ladder for painting to choose for your work.
ReplyDeleteperde modelleri
ReplyDeletesms onay
mobil ödeme bozdurma
nftnasilalinir
ankara evden eve nakliyat
Trafik sigortası
dedektör
web sitesi kurma
Aşk Romanları
Smm Panel
ReplyDeletesmm panel
iş ilanları
İnstagram takipçi satın al
hirdavatciburada.com
Www.beyazesyateknikservisi.com.tr
SERVİS
tiktok jeton hilesi indir
ataşehir vestel klima servisi
ReplyDeleteçekmeköy bosch klima servisi
ataşehir bosch klima servisi
çekmeköy toshiba klima servisi
ataşehir toshiba klima servisi
çekmeköy beko klima servisi
ataşehir beko klima servisi
maltepe lg klima servisi
kadıköy lg klima servisi
You have written a fantastic post, I hope to read many more of your posts in the future. It's easy to get e visa of Turkey with the help of an online process. Which is a hustle free way rather than to visit the embassy and spend more time and money there.
ReplyDeleteThe article you wrote has many valid points, despite the fact that I have read it many times. Your readers will benefit greatly from this content. Travelers can apply for a Turkish e visa which is very easy. You can apply online from any corner of the world. You only need an internet connection and valid documents.
ReplyDeleteThx 4 informations
ReplyDeleteCongratulations on your article, it was very helpful and successful. 79cc8688db9a5ea30523f93626caff2c
ReplyDeletewebsite kurma
website kurma
numara onay
Thank you for your explanation, very good content. 68607763e0b167366a51a4db8ea42c66
ReplyDeletealtın dedektörü
Good content. You write beautiful things.
ReplyDeletesportsbet
hacklink
vbet
sportsbet
taksi
mrbahis
korsan taksi
vbet
mrbahis
Good text Write good content success. Thank you
ReplyDeletekralbet
tipobet
poker siteleri
slot siteleri
kibris bahis siteleri
mobil ödeme bahis
betpark
betmatik
This post is on your page i will follow your new content.
ReplyDeletemrbahis giriş
sportsbet
sportsbet giriş
casino siteleri
sportsbet
casino siteleri
sportsbetgiris.net
mrbahis
mrbahis.co
iznik
ReplyDeletekadıköy
kağıthane
kapadokya
karşıyaka
NUFB
yurtdışı kargo
ReplyDeleteresimli magnet
instagram takipçi satın al
yurtdışı kargo
sms onay
dijital kartvizit
dijital kartvizit
https://nobetci-eczane.org/
RGQX
bitlis
ReplyDeletekastamonu
artvin
ısparta
hatay
3ERM4S
I gained a lot of useful stuff from your article. Thank you for sharing. Calling All Americans In Portugal! Are you an American expatriate living in the picturesque landscapes of Portugal or planning to make this vibrant country your new home? This is your invitation to connect, engage, and build a community that transcends borders.
ReplyDeletesilivri çatı ustası
ReplyDeletefal baktır
indirmeden oynanan oyunlar
ünye veteriner
https://yoltransfer.com.tr/
KSP22
balıkesir
ReplyDeletekarabük
niğde
samsun
üsküdar
HO14FC
This blog post is a rich source of practical insights! It smoothly navigates readers through the topic with actionable suggestions suitable even for novices. The author's talent in dissecting intricate concepts into digestible portions is admirable, ensuring easy comprehension and implementation. It's apparent they've devoted significant effort to curating this content, and it pays dividends. I'll certainly be bookmarking this for future reference and spreading the word among my peers. Credit to the writer for presenting such invaluable information!
ReplyDeleteشركة تسليك مجاري بالاحساء
ReplyDeleteشركة تسليك مجاري
شركة مكافحة حشرات بالاحساء e3NRv2Elu8
ReplyDeleteمكافحة الحشرات بالاحساء y7tgxM7iku
ReplyDeleteشركة مكافحة النمل الابيض بالدمام SDjEaJd5v9
ReplyDeleteشركة مكافحة النمل الابيض بالاحساء KvRUDJhgqW
ReplyDeleteشركة كشف تسربات المياه بالجبيل
ReplyDeleteHr381kobx8
شركة عزل اسطح بحائل
ReplyDeleteeCuKo61Jz1
شركة تسليك مجاري بالهفوف
ReplyDeleteCXzE7JUzOJ
شركة تنظيف فلل بالقطيف
ReplyDeleterilYwQax3
تنظيف أفران المطبخ
ReplyDeletejDJwT1KXgmgD6q